
Over the holidays to keep me busy I have implemented a simple command line implementation of NVidias new AI denoiser. Here are some examples of what it can do,
Original image:
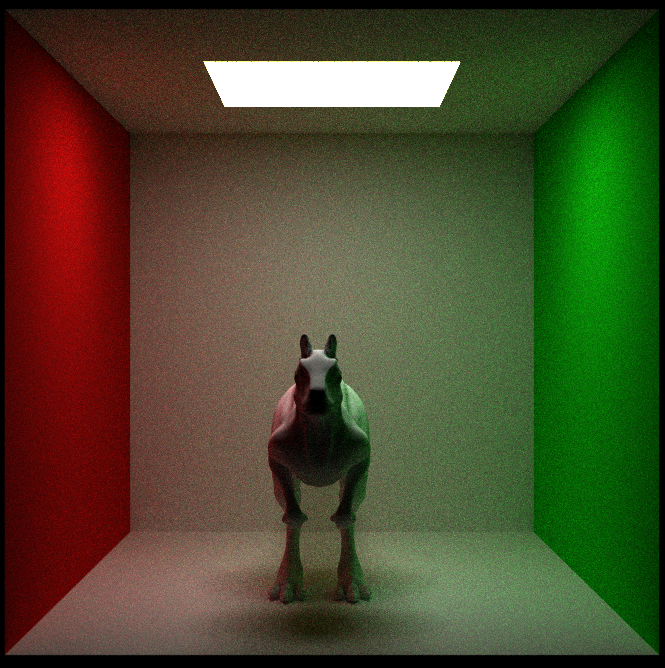
Denoised image:

The code can be found here:
https://github.com/DeclanRussell/NvidiaAIDenoiser
I have created a windows distribution as well for those who wish to try it out here:
Denoiser windows v2.3 Edit 23/04/2019: Updated download to correct link (oops!)

Sharing some experience. Had done some testing with v1.0 & it works pretty nice on unidirectional PT renders (Cycles, LuxCoreRender). But does nothing to images generated with BiDir engines (Maxwell, Indigo).
BTW can it be made to run through a sequence? Whole set of images in specific folder? Wanna test to see, if and how much flickering occurs.
LikeLiked by 1 person
Thanks for taking the time to test it. The results on Bidirectional are very interesting indeed. The training data was done only on unidirectional so perhaps that is the reason for this.
I’ll look into sequences, however EXR support is definitely at the top of my list. In the mean time I’ve created some videos previous for work that demonstrates how well it works with animation if you’re interested? Of course I’ll have to see if I can get permission to share these before.
LikeLike
Hi ! I tried out the denoiser with an exr image with multiple planes stored like diffuse, reflect, etc.
Worked fine the command, however when I try to open in it in After effects is just black. the size of the file reduced. that should happen no?
LikeLike
So you have multiple channels in a single EXR? If so I haven’t added support for that yet.
LikeLike
was no problem
i like experimenting & experiencing novelties in visual tech
so thank you for sharing & getting back
on BiDir
had also assumed so because of iRay – although it’s well capable of BiDir rendering, i guess it isn’t economically feasible for company to do it just yet
on to sequences
was a wishful idea – as you have priorities all set, with EXR being an integral part
it’s totally understandable and i respect that
but… if you might know, how the batch script should look like or have a link to a site, it would mean a lot to me…
am no coder but, still… intrigue & passion for animation burns inside 🙂
so either way i need to grind on, dig further…
Thanks again for your work & keep it up!
LikeLike
ADDENDUM
so i’ve done some more tests (now with 1.1) on interior scene renders and it seems that this denoiser works efficiently only in well lit areas, similar to your cornell box example
and after further observation it also leads me to the question, why is there more noise in the greens?
i wish i would know more about specifications and statistics, what kind of data was this denoiser fed with…
oh, BTW
Does this AI learns while working? Is such an option even possible – switching to learn mode?
LikeLike
No problem, if people are enjoying and making use of it then it makes it worth while 🙂
> but… if you might know, how the batch script should look like or have a link to a site, it would mean a lot to me…
It would probably be pretty easy to setup with a batch script. I think I could whip one up pretty quickly as a short term work around. It would be useful to know how the numbers in your images are formatted i.e. do they have padding like image.0001.jpg, image.0002.jpg etc…
>why is there more noise in the greens?
Are you supplying normal and albedo inputs with the “-n” and “-a” flags. This should improve preserving the colour a lot better than just giving it the beauty alone. If so then perhaps its just a limitation.
>i wish i would know more about specifications and statistics, what kind of data was this denoiser fed with…
The training data this uses is the shipped training data from Nvidia which was trained with Iray. As to the exact training set they used I do not have any information on. OptiX actually ships with tools to create your own training data which is really interesting and could improve results if it were trained with images from the same renderer you’re denoising with. So if you happen to have a couple of thousand image pairs lying around to train it with I would be interested in the results 😉
>Does this AI learns while working? Is such an option even possible – switching to learn mode?
That would be sweet but sadly no its pre-trained. I’m not sure how that would work anyway as you essentially train AI by giving it a big data set of before and after results. When you give it a new before result it can use its training data to try to match a before and produce the expected after result on its own. Is this making sense? However to learn on its own how would it know if what its producing is the correct result?
LikeLike
… 🙂 was imagining a concept of a master artist teaching AI to help on projects later. Something along the lines of personal “AIssistant” – long term study/project. Basically, for starters alike macro maker – recognition of repeating patterns, actions to automate after. Similarly applied in case of rendering, since artists usually develop own styles with years. Just wishfully brainstorming 😉
Seen you’ve updated. Will try some testing over weekend.
TYVM for explanations & stay well
LikeLike
I want to test your app but when I click on the application file nothing happens, a window opens for half a second and closes immediately after. Same on both computers (windows 10). Could you help me with that? Thank you
LikeLike
Hey Alexis,
So its a command line application, this means that you need to use it in cmd. If you’re not familiar with using cmd here is a crash course to running the denoiser.
1. Launch cmd
2. Enter this into the command line
C:/Location of denoiser/Denoiser.exe -i C:/Location of image to be denoised/noiseyImage.jpg -o C:/Location to save image/denoisedImage.jpg
3. Hit enter
4. You should see something similar to the following written by cmd
Launching Nvidia AI Denoiser command line app v2.0
Created by Declan Russell (25/12/2017 ~ Merry Christmas!)
Input image: C:/Location of image to be denoised/noiseyImage.jpg
Loaded successfully
Output image: C:/Location to save image/denoisedImage.jpg
Denoising…
Denoising complete
Saving to: C:/Location to save image/denoisedImage.jpg
Done!
5. Hopefully everything has worked out and you have some nice noise free images
Hope this helps, let me know if you run into any problems 🙂
LikeLike
Ok thanks, very clear mini-tut!
Now it works and does the steps as expected but it doesn’t change anything to my image: the denoisedImage.jpg is exactly the same as the non-denoised image. Even if I add the albedo and normal maps…
I tested on both computers and I have 2 different problems :
1. on my desktop it does the steps but saves an image that is the same as the input, no change whatsoever between input and output
2. on my laptop it says [optix]: Unknown exception. (for the laptop I think it’s a driver problem, you say we need 390.xx or higher, but for my gtx980m there is no 390.xx or higher.)
Thanks!
LikeLike
1. Hmmm thats strange. All I can think of is perhaps the denoiser doesn’t see any noise in the image. Can you try with the example noisy image from this page or send me the image you’re trying to denoise?
2. Yes you definitely need a driver of 390 or higher. You can find the one for your card here,
http://www.nvidia.co.uk/download/driverResults.aspx/135812/en-uk
LikeLike
Hi Declan
I have used your Denoiser.exe for some Images and it is producing very good output, but I have found one issue with that after denoising the image I am facing antialising problem. the edges are becoming so much dirty. do you have any thoughts on this?
LikeLike
Hi Vijay,
I haven’t experienced any aliasing issues myself with the denoiser. Would you be able to send me an example image of the results you are getting so I can get a better idea of what to look for?
LikeLike
I’ve tried using the denoiser not with renders, but with photos, so this may be the problem but the thing doesnt work like… At all. It somewhat manipulates images, changing them a bit, but the noise stays the same. Tried several ISO values, .png and .jpg files, updated the GPU driver, though it was 391 already – nothing changed.
The test image was denoised normally though, meaning it certainly works, so i dont know what the problem is even.
LikeLike
Hey Alexandr,
So I too have tried this on photographs and found similar results. Its all down to the training data that the denoiser uses. In my experiments it seems that it doesn’t perform very well with the colour noise that you get in photographs. However it does seem to work quite well with monochrome photographs as it has similar monochrome noise that most renders like the example image would have.
LikeLike
It works great !
But I don’t understand the “HDR training data”
LikeLiked by 1 person
Awesome! So the denoiser ships with two sets of training data. One that was trained on HDR images and one on LDR images. You will likely get better results leaving the HDR training data enabled. I’ve just left it as an option just in case there are cases it doesn’t work well. I may remove it in the future.
LikeLike
I’ve tested it on two machines and one of them’s giving me trouble. The denoiser.exe process won’t terminate itself after having output the result. Have to kill the process manually for batch script to continue. OS: Windows 7SP1, latest drivers, gtx1060. Other than that, promising results!
LikeLike
I can confirm the issue mentioned by mdresner and several people reported the same issue when using D-Noise in Blender, which also finally makes use of denoiser.exe. In my case Win 7, gtx1070, latest NVidia drivers. When I make the most direct test by calling “denoiser.exe -i test.png -o denoised.png” from cmd the program reads the inputfile, then says “denoising…”, then “denoising complete”, then writes the output file (and creates it if it does not exist) containing the nicely denoised image, then says “Done!” and that’s it. The process denoiser.exe stays alive and the input prompt does not come back until the process is explicitely killed. With Blender this means that Blender hangs after each application of denoising until the process has been killed using the task manager.
Its seems to be an issue with denoiser.exe under Win7. When I use Win 10 with the identical hardware everything runs without problems as it should.
The denoising results I find really impressive.
LikeLike
This is exactly my case. Every machine with windows 10 I tested ran fine, and windows 7 gave me trouble. I’ve tried running the .exe from powershell as well as cmd
LikeLike
Are there any news on this isssue ? I can confirm the same issue on win7
LikeLike
Thanks so much for posting your work. I’d love to give this a try but I get this error.
[OptiX]: Unknown exception
Here some information about the equipment I am using:
NVIDIA System Information report created on: 02/13/2019 15:48:33
System name: ASUS-A53S
[Display]
Operating System: Windows 10 Home, 64-bit
DirectX version: 12.0
GPU processor: GeForce 610M
Driver version: 388.57
Direct3D API version: 11.2
Direct3D feature level: 11_0
CUDA Cores: 48
Core clock: 850 MHz
Shader clock: 1700 MHz
Memory data rate: 1600 MHz
Memory interface: 64-bit
Memory bandwidth: 12.80 GB/s
Total available graphics memory: 5008 MB
Dedicated video memory: 2048 MB DDR3
System video memory: 0 MB
Shared system memory: 2960 MB
Video BIOS version: 75.19.4D.00.03
IRQ: Not used
Bus: PCI Express x16 Gen2
Device Id: 10DE 1058 16521043
Part Number: 1317 0000
[Components]
NvUpdtr.dll 2.8.1.21 NVIDIA Update Components
NvUpdt.dll 2.8.1.21 NVIDIA Update Components
NvGFTrayPluginr.dll 2.8.1.21 NVIDIA GeForce Experience
NvGFTrayPlugin.dll 2.8.1.21 NVIDIA GeForce Experience
nvui.dll 8.17.13.8857 NVIDIA User Experience Driver Component
nvxdplcy.dll 8.17.13.8857 NVIDIA User Experience Driver Component
nvxdbat.dll 8.17.13.8857 NVIDIA User Experience Driver Component
nvxdapix.dll 8.17.13.8857 NVIDIA User Experience Driver Component
NVCPL.DLL 8.17.13.8857 NVIDIA User Experience Driver Component
nvCplUIR.dll 8.1.940.0 NVIDIA Control Panel
nvCplUI.exe 8.1.940.0 NVIDIA Control Panel
nvWSSR.dll 23.21.13.8857 NVIDIA Workstation Server
nvWSS.dll 23.21.13.8857 NVIDIA Workstation Server
nvViTvSR.dll 23.21.13.8857 NVIDIA Video Server
nvViTvS.dll 23.21.13.8857 NVIDIA Video Server
NVSTVIEW.EXE 7.17.13.8857 NVIDIA 3D Vision Photo Viewer
NVSTTEST.EXE 7.17.13.8857 NVIDIA 3D Vision Test Application
NVSTRES.DLL 7.17.13.8857 NVIDIA 3D Vision Module
nvDispSR.dll 23.21.13.8857 NVIDIA Display Server
NVMCTRAY.DLL 23.21.13.8857 NVIDIA Media Center Library
nvDispS.dll 23.21.13.8857 NVIDIA Display Server
PhysX 09.15.0428 NVIDIA PhysX
NVCUDA.DLL 23.21.13.8857 NVIDIA CUDA 9.1.112 driver
nvGameSR.dll 23.21.13.8857 NVIDIA 3D Settings Server
nvGameS.dll 23.21.13.8857 NVIDIA 3D Settings Server
LikeLike
Hi Dana,
Which version are you using? Version 2.2 drops support for Keplar architecture (nvidia 600 series) but you should still be able to use the previous versions. Also you will need to update your Nvidia driver.
Let me know if this fixes the problem 🙂
LikeLike
Hi Declan,
I’ve tried all three versions. with the same results. I am using the latest driver from NVIDIA, 391.35, but I’ve tried an earlier version, 391.24, too
Thanks,
Dana
LikeLike
Hi Dana,
Sorry you are having problems with this. I’ve done some deeper research into this and unfortunately it turns out that the Geforce 610m is actually built on the Fermi architecture and will be unable to run the denoiser
LikeLike
Hi Declan,
No problem. Thanks for checking. I guess I need to pick up something that I KNOW will work for one of my desktops. What would you suggest on the low end?
Dana
LikeLike
Hmm thats a tough question as it really depends on budget and use case. In my opinion the 10 series are really good value for money but they do not have all the cool new AI/Raytracing hardware that the new cards have. So who knows how they will age.
Before you buy a new card perhaps you would be willing to try the Intel AI denoiser instead? Its essentially the same algorithm but on CPU. I’ve just published a release here https://github.com/DeclanRussell/IntelOIDenoiser.
The training data is different however. So far in my brief testing I have found that some scenes work better with the Nvidia denoiser and others are better with the Intel.
Hope this helps 🙂
Dec
LikeLike
Hi Declan,
Thanks for the suggestion. I’ll check out your new code too, but it looks like I’ll need to compile it. Do you plan to do a binary release?
Best regards,
Dana
LikeLike
There are binary releases in the release tab 🙂
https://github.com/DeclanRussell/IntelOIDenoiser/releases
LikeLike
any chance of supporting linux any time soon?
LikeLike
Hi Jonathan,
This is something I wan’t to do but I don’t now about soon. I don’t have a lot of time to setup a linux dev environment.
If you have an environment already setup, this thread could be of help if you want to build it yourself?
https://github.com/DeclanRussell/NvidiaAIDenoiser/issues/4
LikeLike
I just found the release. But just fyi this is the error I get when trying to run scons:
D:\IntelOIDenoiser-master>scons
scons: Reading SConscript files …
KeyError: ‘CUDA_PATH’:
File “D:\IntelOIDenoiser-master\SConstruct”, line 6:
CUDA_INCLUDE_PATH = os.environ[‘CUDA_PATH’] + “/include”
File “C:\Python27\lib\os.py”, line 425:
return self.data[key.upper()]
LikeLike
Great job, thank you!
LikeLike
Hi, this looks very interesting, and I wanted to try it out with images from an old halo raytracer (HaloSim3: https://www.atoptics.co.uk/halo/halfeat.htm ), however the running the batch file just gives me this error:
Input image: Test1.png
Loaded successfully
Output image: denoised_Test1.png
[OptiX]: Unknown exception
Any idea what I’m doing wrong?
Tried on a GTX1080, driver version 417.35
LikeLike
It should work with that card. Can you try updating your driver trying again with the latest version?
LikeLike
Would love a way to do a batch denoise like everything in Folder A denoise it then put the denoised versions in Folder B
LikeLike
Sorry for the late reply, this fell under the radar a bit. This tool may fulfill your request,
http://taosoft.dk/software/freeware/dnden/
LikeLike
Hi Declan,
thats like the icing on the cake. Thanks so much.
One question, does your denoiser keep the alpha channel in the images when batch processing?
Grant’s version for Blender drops it at the moment and I need the alpha channel to stay in the images (its a couple of hundred png files…
Fran
LikeLike
Hi Fran,
No problem 🙂 It should keep the same format as what it has been given, so in theory it should keep the alpha channel. That being said I haven’t explicitly tested this so if it doesn’t let me know and I’ll see if I can sort out a fix.
Cheers,
Dec
LikeLike
Hi Declan I tried using this but it comes up with not output file extension.
LikeLike
What is the command you are using? Are you giving a valid output like “-o output.png”?
LikeLike
Hi! Thanks for your work. Can you help me?
GeForce GTX 1050ti
Driver version 416.34
[Optix]: Failed to load Optix library
terminating…
LikeLike
Hi, You need a newer nvidia driver. Something 436.XX or higher. Try this one https://www.nvidia.co.uk/download/driverResults.aspx/153345/en-uk
LikeLike
Hi there,
Great work. Any plans on updating this to Optix 7.0?
Regards,
Tom
LikeLike
Hi Tom,
Thanks! I probably will at some point but currently AFAIK there isn’t any advantage to doing so as the denoiser will be the same between versions. Feel free to correct me on this if there is something that OptiX 7 will bring that you think will be beneficial.
Cheers,
Dec
LikeLike
hi, it is does not work for me… no output file
LikeLike
Hi Linap,
Could you post the output log printed when running the executable?
LikeLike
Thank you for this! I tested it out on some of my fractals and it cleaned them up!
LikeLike
Thank you for this! I tested it with two of my fractals, and it cleaned them up nicely.
LikeLike
Awesome! Glad you found it useful 🙂
LikeLike
Is that add ons or program .. how can i use it ?
LikeLike
Its a command line too. See this comment for an example of its usage https://declanrussell.com/portfolio/nvidia-ai-denoiser/#comment-285
LikeLike
HOW TO INSTALL THIS DENOISER?
LikeLike
Its a command line tool, no need for any installation. See here for how to use it.
https://declanrussell.com/portfolio/nvidia-ai-denoiser/#comment-285
LikeLike
Hello, Thank you for the great work, though I am not able to make it work on this image https://drive.google.com/file/d/1O9vBcKfpM6Toj6RZbIf7-gHxXrq2xVp9/view?usp=sharing
I have tested image from above and worked like a charm ( https://imgur.com/a/HSGxoSb#m5d9TG1 )
Do you have any ideas what could I do wrong?
LikeLike
Hey MJ,
Thanks, glad to see you have had some success with it. Can you give me some information about how the image was rendered, which renderer and which output filter did you use? These AI denoisers typically only work with either box filtering or FIS filtering. If neither of these options still work, feel free to try the intel version of this denoiser which has different training data and therefore may give different results (https://declanrussell.com/portfolio/intel-open-image-denoiser-2/).
LikeLike
Hi, thanks for the tool! I have included it into the latest version of JWildfire (free flame fractal software): https://jwildfire.overwhale.com/
Cheers!
LikeLiked by 1 person
Awesome! 🙂
LikeLike
Intersting piece of code. However Nvidia changed the API completely. Thus your code is broken…
Any chance to adapt the code to fit with new Optix SDK 7.0.0?
LikeLike
Its on my to-do list 🙂
LikeLike
[OptiX]: A supported NVIDIA GPU could not be found
My GPU GT710
LikeLike
Your GPU is too old and OptiX doesn’t support it. Feel free to try the intel version instead though https://declanrussell.com/portfolio/intel-open-image-denoiser-2/
LikeLike
Hi,
I would really like to make this work and integrate it to my photo workflow.
I tried version 2.3 & 2.4 on DNG, JPG & TIF images.
I am running Windows 10, my driver 461.40 for Nvidia GTX-745
The results:
c:\Users\Administrator\Desktop\Denoiser_v24>Denoiser -i 6400.tif -o 6400dn.jpg
Launching Nvidia AI Denoiser command line app v2.4
Created by Declan Russell (25/12/2017 ~ Merry Christmas!)
Input image: 6400.tif
Loaded successfully
Output image: 6400dn.jpg
Denoising…
Denoising complete in 5.722 seconds
[OptiX]: Unknown error (Details: Function “bufferMap” caught exception: Encountered a CUDA error: cudaDriver().CuMemcpyDtoH( dstHost, srcDevice, byteCount ) returned (702): Launch timeout, file: , line: 0)
Do you have a solution?
LikeLike
Hi Pierre,
Apologies for the late reply. Unfortunately your GPU is Kepler architecture, which means that its too old to run the OptiX denoiser. You will need Maxwell architecture or higher. Just FYI, if you’re looking to use this for photography, from my own experiments I would recommend using a different denoising solution. The denoiser is trained on CG images and cannot remove colour noise well (or at all). Monochrome photos can work occasionally, but given the difference in training data I wouldn’t be surprised if you ran into issues now and again.
Cheers,
Dec
LikeLike
“The denoiser is trained on CG images and cannot remove colour noise well (or at all).” Hmm yes I have found the same. Can you propose viable solutions for de-noising colour noise?
LikeLike
You would need to use another denoising solution. I’ve not had any experience with any personally, but I’ve heard good things about Neat video. Maybe that is worth a try?
LikeLike
Hi Declan. Do you think this might be possible to glsl and make a matchbox shader for flame?
LikeLike
Hi John, Unfortunately the denoiser is a propriety library from Nvidia that is CUDA based. So there is no way for me to port it to GLSL. The flame team could of course integrate the library it flame with the use of some GL-CUDA interoperability. However you would need to talk to their dev team abut that.
LikeLike
Great. No problem. I thought it might be an interesting experiment. I currently use neat video and it’s excellent.
LikeLike
Hi Declan, I imagine you already know Intel published the 1.4 OID with some great new features and improvements ! So if you have insomnia it will be awesome 🙂
Thanks again ++
Chris
LikeLike
Hey Declan, thanks for sharing your tools! Do you have any thoughts on the new temporal denoiser in Optix 7.3? Is that something you’re thinking of implementing at any point?
LikeLike
Its something I’m actively working on. Stay tuned! 🙂
LikeLike
That’s awesome. You’re a genuine hero.
LikeLike
Hello? please can you help? i’m getting [OptiX]: Unknown exception problem. I have a driver of 425 version, GeForce 920m! what should i do?
LikeLike
Hi Jack, apologies for the slow reply. I believe you may need to update you driver.
LikeLike
Hi Declan,
your implementation is very easy to use!
Could I integrate your program in my Now3D2 render?
Thanks in advance
LikeLike
Sorry for the long awaited reply. If you haven’t done it already, of course, this is fine with me 🙂
LikeLike
hi declan russell i saw your denoise is awesome but can install on render like fstorm
LikeLike
Glad you enjoy the tool! Unfortunately, I don’t really know enough about fstorm to know what would be involved in integrating this into it. That may be more of a question for the developers of fstorm. You should be able to use the CMD tool here on images output by fstorm though regardless.
LikeLike
Hi Declan. Thank you for the great job. It works – except the switches. I mean I don’t know how to use repeat and the rest commands. Could you give some help, please?
Thank you.
LikeLike
Hey! Thank you 🙂 Which switches specifically trying to use? There are some details in the help “Denoiser.exe -h”. The -repeat option is really just for performance profiling. It just loops the denoiser N times to compute some average execution time. Probably not super useful for you unless you are doing some research.
LikeLike
Thank you Declan. I would just like to see a completed command line, because the order and syntax is not clear for me. denoiser -i picture/pict.jpg -o picture/pict2.jpg means a normal denoising procedure. If I want to refine iterations does look like this? (For instance:)
denoiser -i -repeat [5] picture/pict.jpg -o picture/pict2.jpg
Thank you.
LikeLike
Replying here to your second message because wordpress’s bad design won’t let me reply directly.
Here is the simplest command line you can have
C:/Location of denoiser/Denoiser.exe -i C:/Location of image to be denoised/noiseyImage.exr -o C:/Location to save image/denoisedImage.exr
This will take and input image and give you some denoised output image. Unfortunately, there is no way to “refine” the denoised result. The denoiser is based on a machine learning, so the result you get is what you get, it either works or it doesn’t. However, you can help the denoiser by giving it additional information, such as your albedo and the normal of your image if you have them (I am assuming that you are denoising computer generated images and not photos? The denoiser doesn’t work for photos). You would do this like so,
C:/Location of denoiser/Denoiser.exe -i C:/Location of image to be denoised/noiseyImage.exr -a C:/Location of image to be denoised/albedo.exr -n C:/Location of image to be denoised/normal.exr -o C:/Location to save image/denoisedImage.exr
Some things to note. If you’re providing a normal feature image, you should use some file format that supports negative pixel value, such as EXR. Otherwise, you will have incorrect information fed to the denoiser.
Hope this helps 🙂
LikeLike
You are doing God’s work Sir. Thank you
LikeLiked by 1 person